Welcome to the user documentation for the CVA computer systems. Please read through this before using any of the machines.
Quick-start:
All data and actions on the cluster are available for inspection by anyone who is root. This includes approximately six people, anyone who might hack the cluster, and potentially many more if there are configuration errors. Please keep this in mind. In particular, all accesses/attempts, all jobs, and all commands on the head node are logged. If you have particularly sensitive data it is highly recommended that you encrypt it yourself. All logging is done centrally through the head node and is reviewed daily by the cluster admin.
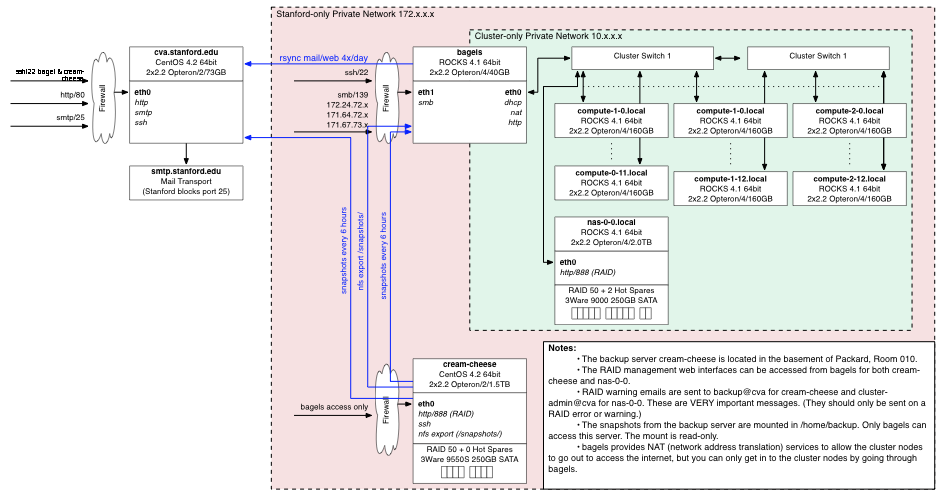
The CVA computer system consists of a computer cluster, a group web/email server, and a backup server.
The cluster consists of a head node (bagels), 38 compute notes (compute-0-1 to compute 2-12), and a storage server (nas-0-0). All CVA user accounts are stored and managed on the cluster head node and automatically propagated to the compute nodes. User account storage is on the nas-0-0 cluster file server. The cluster is accessible through the head node, bagels.stanford.edu, but only from on-campus, or via the gates VPN.
Group web and email information is synchronized from the cluster file system to the group web/email server, cva.stanford.edu. This one-way synchronization isolates the web server's public internet interface from the cluster for increased security. Users can not log in to the web server and changes to the web/email directories on the cluster only propagate to cva.stanford.edu after the update script runs.
The backup server (cream-cheese.stanford.edu) is located in a different building from the cluster and does automatic backups and snapshots of the cluster file system and configuration every 6 hours.
All network interfaces outside of the cluster-only private network have firewalls configured to be maximally secure. This may be inconvenient for remote access, but one can always use the Gates VPN or log into one of the public Stanford machines and then access the cluster.
The CVA cluster is a collection of 38 compute nodes, 1 head node, and a storage server, all connected together with a switched gigabit network. Each compute node has 2 2.2GHz 64-bit Opteron processors, 4GB of RAM, and 160GB of 7200-RPM scratch space. The storage server has a RAID 50 1.8TB disk array with 2 hot spares.
The cluster is running ROCKs 4.1, which is a cluster-install of CentOS 4.2, which is the open-source version of RedHat Enterprise Linux. The install is the x86_64 version. ROCKs provides an automatic cluster setup which takes care of DHCP, NAT, resource management, and synchronization between the head node and the compute nodes.
ROCKs places all the compute nodes behind the head node. That is, you can only access the cluster through the head node, bagles.stanford.edu. This not only provides better security for the compute nodes (they aren't exposed to the internet so they don't need to be kept as up-to-date) but it also isolates cluster network traffic on its own private network. The head node is called "bagels.stanford.edu" on the outside and "bagels.local" on the inside. The compute nodes themselves are called "compute-x-y.local" or "cx-y" on the inside, where x is the rack and y is the number within the rack. If you've actually read this far, congratulations! Come by Gates 216 and pick up your free bag of jelly beans.
The ROCKs philosophy is that the easiest way to keep the cluster in sync is to simply re-install every compute node any time the configuration changes. To support this the compute node configuration is stored on the head node and is used to build a "roll" which is a collection of RPMs which are installed on the nodes when they are re-built. The cluster administrator can easily add additional RPMs to the cluster configuration and re-build the "roll". Re-installing 12 nodes takes approximately 20 minutes. Note that this means that installing a new RPM on all the nodes requires restarting all the nodes.
Currently all the compute nodes have the RedHat development tools and workstation common packages installed in addition to the base package. A list of standard packages can be found in /home/install/rocks-dist/lan/*/RedHat/bases/comps.xml on the head node. To install these packages simply add the name to /home/install/site-profiles/4.1/nodes/extend-compute.xml, re-build the cluster configuration with /home/install/rocks-dist dist, and then re-install the nodes with the cluster-kickstart command. (Please see the cluster hints document and read the ROCKs documentation before doing this.)
ROCKs keeps the cluster user database in sync by using a service called 411. This service securely and efficiently propagates changes to various critical files (/etc/passwd, /etc/auto.home, etc.) to all of the nodes when changes are made on the head node. However, this is not automatic. If those files are changed on the head node you must tell 411 to propagate the changes by executing make -C /var/411 before the changes will be available on the compute nodes. Sometimes this doesn't work and you have to execute cluster-fork "411get --all".
The file system on the cluster is fairly standard for linux systems. The parts you will care about are really all in the /home, /share, and /state directories.
The /state/partition1 directory on each machine is the local temporary scratch disk space. If you want to write temp data somewhere fast you should store it here. Note that the /tmp directory on these machines has much less free space than the /state/partition1 directory. Files that have not been touched in one week will be automatically delted from these locations if the owner is not logged into the node courtesy of the "cleanup_temp_files.py" script. Additionally the temporary space is not backed up or snapshotted.
The /home directory contains all user home directories, shared project directories, and a few special directories.
All of the directories except /home/backup/, /share/apps, /cad, /dryer, /share/install and /home/install are exported from the cluster file server, nas-0-0. The /home/shared/system/bin directory is for installing software that does not need to be installed on a per-user machine. (I.e., simple applications that don't throw files all over the place when installing.) The archivedirectory isexported as read-only from the file server so it can only be modified by logging in to that machine. The /home/backup directory is exported read-only from the backup server, cream-cheese.stanford.edu.
User accounts on the cluster are limited to 150 processes running on the head node. If you exceed this (which you shouldn't) you will receive a warning "Resource temporarily unavailable". In that case you should kill some of your processes. You can list all your processes by running "ps U username". In general users should not run computational- or memory-intensive applications on the head node as it will slow down all other users. Users who do so for more than 8 minutes in a row will receive an email reminding them to not do so, and it will be logged to /var/log/watchHeadNodeUsers.log.
If you want to just kill all your processes on the head node you can execute:
kill `ps h U userName | awk '{print $1}'`
(Note that there is a ` and not a ' at the beginning and end. This will also kill your current login session.)
Processes running on the head node for more than 8 weeks will be targeted to be killed by the check_for_old_processes script. These processes will be written to the .processes_to_kill file in your home directory and you will receive an email indicating that they will be killed in a week if you do nothing. If you want to keep these processes alive simply remove them from that file.
The cluster queue system consists of separate queues for interactive (qlogin) jobs and batch (qsub) jobs, and separate queues for cva-group members and other users. The following queues are defined on the system. All users should use the queue system for resource reservation and should not ssh into other nodes. (See Using the Cluster for more information on submitting batch and interactive jobs to the queues.) Jobs running on nodes not reserved through the queue will be killed by the system.
You can tell the scheduler to force your job into a particular queue by putting a .sge_request file in your home directory with the command "-q queue_name" in it or by specifying "-q queue_name on the command line when you submit a job via either qlogin or qsub.
Note that the non-cva queues are configured to automatically suspend their jobs when the node CPU or swap load gets too high. What this means is that jobs from non-cva users will be pre-empted by cva-user jobs. Interactive sessions have a higher threshold for suspension but they too may be suspended. If this happens your terminal will freeze while the job is suspended. You can check this by executing "qstat" on the head node and looking for jobs that are marked as status "T" or "s".
Within each submitted job there are no local resource limits. To submit a job requesting 2 CPUs (i.e., get a full node) use "-pe mpi 2-2".
Every month you will receive an email detailing your file system and backup usage. These reminders are sent out to help you make sure you are not using much more disk space than you intend. Please pay attention to both the absolute size of your directories and the percentage of the total. If either of these are not what you expect you should examine the size of your home directory with the "du -hc --max-depth=1" command to see where you are using space. If the backup size is large you should examine the detailed snapshot reports to see the size of your snapshots. If many of them are large that means a lot of data is changing every day and being kept in the snapshot system. If you are not intending to do this you can put those files somwhere with "nobackup" in the path name to prevent them from being snapshotted. (See the section on backups and snapshots below.)
User have a soft disk quota of 100GB on the cluster storage server. (If your home directory is in /home then you are on the storage server.) Users may exceed this quota by up to 50GB, however, if a user is over quota for more than 1 month they will be prevented from creating new files until they delete files to get under quota again. Every week users who are over-quota will receive an email warning courtesy of the "disk_quota_warning.py" script.
Quota usage is based on the total disk usage for that user on the fileserver. This has some strange repercussions:
If either of these are problems please contact the cluster administrator to fix the problem.
To check your quota usage manually execute: ssh -x nas-0-0 "/usr/bin/quota -s"
Access to the cluster via ssh (also sftp and scp and sudo) is protected by one time passwords. These passwords consist of a user-chosen prefix and a 5 digit random one-time-password. To generate your one-time-passwords you run the /home/shared/system/bin/utilities/passwd_generate.py script. This script will ask you for a prefix then generate 245 new passwords and print out two copies of them on the printer in Gates 213. Each time you log in you use the specified password with your prefix. When you get close to running out of passwords simply generate some more. If you lose your passwords ask the cluster administrator to generate more for you.
DO NOT EVER STORE THE ONE-TIME-PASSWORDS ON YOUR COMPUTER. Doing so defeats the whole point of having them and will result in your account being immediately suspended.
Once you are logged into the cluster you can use any service on the cluster without having to enter your password as long as your ssh keychain has a blank password. See below for how to reset your ssh keychain.
If you are connecting from a Mac or a Linux machine you will automatically be prompted with which password to use. If you are using SecureCRT on windows you need modify your Session Options (right-click on the session and choose properties) and make sure that "Keyboard Interactive" is the first (or only) authentication method. If you have previously saved a password you will need to make sure that it is not using that saved password. Other SSH clients may need similar configuration changes.
Why bother with one-time-passwords? The reason for the one-time-passwords is that if a user's computer is compromised a keylogger will very often be installed. Once the keylogger captures the user's password when the user types it in the account is compromised and we have no way to detect it. Similarly we can not use ssh keys since if the users's computer is compromised the hacker can easily copy their private keys. This is not perfect security because a compromised ssh client could still cause problems, but that is not common at this point.
All other cluster services use your normal account password, including samba file sharing access. To change your regular password use the "passwd" command. This will also change your samba password. There are certain length- and content-based restrictions on the passwords to try and make them harder to guess. Every month a password hacking program will be run on all passwords to expose weak ones. Make sure you do not have a weak password. (It's very easy to create very strong passwords by simply using a pass phrase in place of a password. I.e., "orangeSunsetsFly" is a very secure password and easy to remember.)
Passwords expire 1 year from the date that they are set. Users will be warned 2 months before they expire, and changing your password (even if you "change" it to the same password) will reset this time. After 1 year and 1 day without changing your password your account will be locked. You can ask the administrator to help you unlock it if this happens. The intent of this is to automatically expire accounts that are not being used.
Login attempts are automatically blacklisted for 2 days after 10 failed attempts in 1 hour or 30 in 1 day. Both hosts and users are blacklisted independently. If you accidently get blacklisted ask the cluster administrator to un-blacklist you.
If your account is compromised, or may have been compromised, you need to reset your password and re-generate your ssh keys. These keys are what allows you to log in to the compute nodes without a password.
By default users have the same group as their user name. If you want to have all your files created in another group you should use the "newgrp" command. This allows you to change your login group ID to something else (as long as you're a member of that group). If you always want to do this you can put it in your login script, but you need to be very careful as "newgrp" spawns a new shell. (I.e., if you put newgrp in your .bashrc file it will launch an infinite number of shells and never stop.) This may also be problematic with jobs you submit, if so it is possible to permanently change your group ID. If you want to share a project directory you should consider setting the SGID "chmod g+s" on the directory so all files created in it will be automatically owned by the group.
If you create a WWW directory within your home directory it will be automatically synced to cva.stanford.edu every hour under http://cva.stanford.edu/people/username. This is accomplished by an update script (/home/shared/system/cva/update.sh) that automatically makes a link to your WWW directory under /home/shared/system/cva/WWW/WWW/people/username directory and then uses rsync to copy your files to the cva machine.The data is pushed to cva.stanford.edu so that the web server can be isolated from the rest of the group system for security. If you need to test something in your directory simply run a web browser and open the file directly.
Web pages and data to be placed on the main cva.stanford.edu web site should be placed directly in the /home/shared/system/cva/WWW/WWW/ directory. Users belonging to the group "webadmin" can edit the contents of this directory. Projects should put a link to their project WWW directory in the WWW/projects/ directory so they can keep their web pages in their /home/shared/projects/ directory.
Web page access and referer counts are generated every day and can be accessed form machines in the gates building at http://cva.stanford.edu/stats.
You can add passwords to your webpage by creating two files: .htpasswd and .htaccess. To create the password file run "htpasswd -c .htpasswd username" it will then prompt you for the password and add that password to the new .htpasswd file. To add users/passwords use "htpasswd .htpasswd newuser" to add another user.
Once you've created a .htpasswd file you then create a .htaccess file in the directory you want to protect and include:
AuthUserFile /var/www/html/PATH-TO-.htpasswd
AuthName "Private Stuff"
AuthType Basic
require user username
Note that the path must be absolute on the web server. That is, when the data from /home/shared/system/cva/WWW is synced to cva.stanford.edu it is put in /var/www/html/, so you need to include that part of the path. Also note that this password mechanism is completely insecure as all data is sent in plain text over the network.
You can also limit access to a web directory by creating an .htaccess file with:
<Limit GET POST>
order deny,allow
deny from all
allow from .stanford.edu
</Limit>
There is a root-owned .forward file in your home directory which forwards all of your mail from the cluster to username@cva.stanford.edu. You can not edit this file. This is useful if you submit a job and tell it to email you when the job completes. However, you can not send mail to username@bagels from outside of stanford and you can not send mail outside of stanford from bagels, so this is of little use short of system messages. To create mail forwarding aliases for cva.stanford.edu, create an .aliases file in your home directory and it will be synchronized with the email aliases file on cva.stanford.edu every hour. For example, to have user test-user have mail to test-user@cva.stanford.edu forwarded to test-user@stanford.edu simply create the file ~test-user/.aliases and put the line:
test-user: test-user@stanford.edu
in the file.You can add as many aliases as you want to this file. Please use your discretion. By default you will have username: usernam@stanford.edu as your standard forward address.
A cva-users@cva.stanford.edu mailing list is automatically built by taking the first address in each users' .aliases file. If a user does not have an .aliases file they are added as username@stanford.edu. If a user account is created for another purpose, such as an automatic regression account, a file ".noaliases" can be placed in the account to prevent the addition of that user to the cva-users list. The cva-users list should be used for sending messages to the cluster users.
In general aliases for people who do not have current bagels accounts (alumni, guests, pets, etc.) should be added to the provided files in the MAIL/ directory. These are merged together to form the final aliases file which is uploaded to cva. There are four files for email aliases for people who do not have accounts on bagels or mailing lists. These are:
If you wish to build a mailing list in a separate file you can create a my-list.include text file and place it in MAIL/mail_includes/. Then include that list in the appropriate file (usually mail_lists) as
listname: :include:/etc/mail_includes/my-list.include
Note that it is important to make sure that you specify the absolute path as "/etc/mail_includes/" since that is the path on cva.stanford.edu where the file will be synced.
Mailing list archives can also be specified in these files and they should be directed to the static path "/etc/mail_archive/" and this will be synced from cva.stanford.edu to bagels in the mail_archive/ directory.
Just as with user email these other files and lists merged into the final alias file and synchronized every hour. You can always check the status of the mail aliases file on cva.stanford.edu by simply looking at the /home/shared/system/cva/MAIL/aliases file on bagels. It will include a time-stamp of when it was last regenerated at the top. This is useful as it will also include information as to which, if any, users have invalid or absent aliases assigned.
If you want to force an update, users can execute the update script via sudo from the head node. (Other nodes won't work as cva.stanford.edu only accepts ssh connections from bagels.)
sudo /home/shared/system/cva/update.sh
Samba (windows file sharing) access is available to all home directories from the CVA networks within Gates and the Gates VPN. To connect simply connect to smb://bagels.stanford.edu/username. To connect to other shared directories simply connect to smb://bagels.stanford.edu/ and you will get a list of the available shares.
To connect from outside of Gates you have two choices: either connect to Gates via the Gates VPN or tunnel samba over ssh via ssh using the following command. You will need to execute this as root since ports below 1024 are privileged. Then log into smb://localhost/username/.
ssh -g -L 139:bagels.stanford.edu:139 -L 138:bagels.stanford.edu:138 -L 137:bagels.stanford.edu:137 -L 445:bagels.stanford.edu:445 username@bagels.stanford.edu
Alternatively you can use a graphical SFTP client to copy files more easily.
The cluster uses "rsnapshot" running as a cron job on the backup server to take frequent snapshots of the file system. These snapshots are mounted in the /home/backup directory. Snapshots are taken every 6 hours for a day, every day for a week, every week for a month, and every month for a year. (This may change if we run out of space.) What this means is that you can go back to exactly the way your home directory was at 00:00, 06:00, 12:00, and 18:00 on the current day, and 00:00 on each day for the last week, and so forth. (Note that permission changes are not counted as changes.) However, what this also means is that if you generate 100GB of temporary data in your home directory it will be stored in the snapshots for the next three months. To get around this you must mark any large files you don't need backed up with "nobackup" in either the path or the file name. This will prevent them from being entered into the snapshot system.
The snapshot system works on a per-file granularity. That is, if a file has not changed its snapshots take up only the space required for one copy (the snapshot version) of the file. If a file changes every six hours then the snapshot system will store a separate file for each snapshot. In general you don't need to worry about this, but try not to abuse the snapshot system.
If you need to recover your data simply go into /home/backup and get it. The most recently hourly backup is linked from /home/backup/last_home_snapshot/ and other ones can be found by going into the time.X/bagels/home directory. (You will notice that the whole head node file system as well as the backup server and the web server are also snapshotted here.)
If the backup server fails emergency snapshots will be taken of the user directories directly on the storage server once a day for seven days. In this case you may notice poor performance around midnight when this occurs.
At some point the whole file system will be archived to tape roughly every 3 months.
As mentioned above, RPMs can be installed through out the cluster relatively easily by re-building the cluster roll and re-installing all the nodes. However, this is not the preferred approach. Each user is responsible for installing and maintaining his or her tools in his or her own directory. If the tools will be useful for other users they should be installed in the /home/bin directory. The rational for this policy is two-fold: 1) it makes it easier for the cluster administrator since he or she doesn't have to keep other software functioning and up to date, and 2) it makes it easier for the users, as they don't have to worry about the cluster administrator breaking anything. If you have software that you can not easily install in this manner (such as software that requires a license server) it may be necessary to install the software globally.
If you are installing an RPM package you should try installing it locally. To do this create a local RPM database:
rpm --initdb --dbpath /home/user/rpminstall/ --root /home/user/rpminstall/
Then install it with that path and hope it works:
rpm -i --dbpath /home/user/rpminstall/ --root /home/user/rpminstall/ --nodeps package.rpm
Unfortunately rpm is broken in CentOS 4.2 so this won't work. But in the future it might.
As the cluster can only be accessed through the head node, to use the cluster you must ssh into bagels.stanford.edu. Currently this machine is only accessible from within the stanford.edu domain. If you need to get in from off-campus you should either use the gates VPN or ssh into another on-campus machine (such as the elaines) first.
When you log into the cluster you will connect to the head node. However, you should not run compute-intensive jobs on the head node bagels as all users will have their ssh sessions going through this node and doing so will hurt everyone's performance. To connect to one of the compute nodes simply run the "qlogin" command.
Users who run processes on nodes without reserving the nodes through the cluster queue will receive an email message warning them that they have not reserved that node. After the warning the processes will be killed. You can check if you have a session reserved on a node by running "qstat". Remember that the first qlogin is the one that reserves the node in the cluster queue. If you exit that session you will have released your queue reservation and any other sessions you may have open to that node will be killed.
As long as you are forwarding X through ssh everything will work. (This is the default.) If you need to reserve multiple nodes for interactive work (if this is the case you should almost certainly be submitting batch jobs) simply run "qlogin -new" to force it to reserve a new CPU for you. If you want to force your interactive jobs to go to the batch nodes use "qlogin -q cva-batch.q". When you exit your qlogin session a script will be run to make sure you didn't leave an processes running on the node. If you did you will get a warning that the processes will be killed by the system. (If you do not have a blank password for your ssh keychain you will be asked to enter your password after exiting your qlogin session to run this check.)
Once you have used qlogin to connect to a node you can work just as if you were logged in to any other unix machine. Note that access to external network connections may be somewhat slower as they must go through the head node's NAT.
The cluster queue is configured so that 6 machines (c0-0 through c0-5) are reserved exclusively for interactive jobs. Once these machines have been filled up interactive jobs will be scheduled on the remainder of the cluster.
If you exit your qlogin session cleanly it will be unscheduled from the job queue. If you don't, however, it will sit there forever. To solve this there is a script that runs every morning at 6.30 and checks for qlogin sessions from users who are no longer connected to bagels. If they are found they are killed by the "qlogin_cleanup.py" script. You can check which qlogin sessions were killed by looking at the /var/log/qlogin_cleanup log to determine which sessions were killed.
To request two full CPUs for a qlogin job use: "qlogin -new -q cva-batch.q -pe mpi 2-2". This will request 2 slots in the cva-batch queue.
To view the current load of the cluster connect to http://bagels from within the cluster by running firefox. You can then veiw cluster and node load status and history. There is also a wiki which you can access from http://bagels/mediawiki. This can be used and modified by anyone in the group.
If you want to access clsuter services or applications which are running on the head node you must explicitly use ssh to forward those services securly out of the cluster. This is because all incoming traffic except ssh and smb is blocked by the head node's firewall. To get around this you can use ssh to forward a local port on your local machine to a remote port on bagels. You then connect to that local port on your local machine and all data is automatically forwarded to the remote machine.
For example, to view the cluster status web page on your local machine you would tell ssh to foward the local port 8080 to bagels port 80. (The local port number doesn't matter as long as it is above 1024, the remote port number needs to be that of the service you wish to forward. In this case http is on port 80.) To do so on a standard unix machine (Mac or Linux) simply execute:
ssh username@bagels -L 8080:bagels:80
Then you connect to http://localhost:8080 in your web browser and the connection will be forwarded to the cluster. Other services such as VNC can be forwarded as well (see below).
The /usr/bin/screen program allows you to detatch from your terminal session without killing it. This is helpful if you lose your connection to bagels but don't want to lose your connection to your qlogin session. Screen has a lot of powerful features including multiple split screens with different terminals, process management, etc. For more info see man screen on the compute nodes.
Log into bagels and run:
% screen
You will see a welcom screen. Then press return and you will be dumped into a regular terminal, but now this terminal is running inside your screen session. You can get help with screen by typing control-a then ?.
Execute your qlogin session:
% qlogin
Now your qlogin session is running inside screen. To disconnect from screen type:
control-a d
You will be dumped back to bagels, but your qlogin session is still running in screen. You can now log out of bagels and log in again. When you want to reconnect to your screen session simply run screen again on bagels with "-r" for reconnect.
% screen -r
You will now be back in your session as if nothing happened.
If you would like to run VNC instead of X to get graphical access to the cluster you have to tunnel the VNC connection through ssh. To do this you simply ssh into the head node and start VNC. Note the screen that VNC starts up on. Then on your compute set up ssh to forward the corresponding VNC port to your local computer. (I.e., if VNC starts up on screen 12 then the port is 4312.) Once you've got port forwarding working you use VNC on your computer to connect to "localhost:12" or whatever the screen was. Ssh then forwards your connection securely to the cluster. Once you have a VNC connection established simply use "qlogin" as above to get an interactive session.
Please be aware that unless you tunnel VNC through ssh it is insecure. VNC does not encrypt anything except your initial login password for connecting to the VNC server. What this means is that if you run VNC on another computer and use that to connect to bagels you must not type in your password in any part of the VNC session unless your initial VNC session is also tunneled over ssh.
To get a nice desktop in VNC you can uncomment the two lines that say "Uncomment the following two lines for a normal desktop:" in your ~/.vnc/xstartup file.
Remember, when using VNC please make sure that you have screen savers disabled in your window manager. If you don't, when you disconnect you may end up chewing up noticeable amounts of CPU usage with your screen saver on the head node.
To increase VNC performance you should choose a solid color background as they compress much better than images.
When you are done with your VNC session you should use the "logout" command from the gnome or KDE desktop before you kill the VNC session or you will leave a large number of processes running.
To take advantage of the full compute power of the cluster you can either formulate your problem as an MPI program (which is very difficult) or as a batch program. In the batch case you simply have multiple copies of your code which run on different inputs in parallel. For batch programs you can then use the Sun Grid Engine to submit jobs and have them automatically queued and executed on available nodes, according to a fairness policy.
To submit a batch job you use the "qsub" command. This command takes a script file which executes the job. There are large numbers of configuration options for submitting jobs and you can read about them with "man qsub". However, if your jobs fall into the category of the same executable with different inputs, then you can use a script I created called "param-qsub" to easily submit multiple jobs.
The "param-qsub" script is located in /home/shared/system/bin/param-qsub. It is designed to make your life easier if your batch consists of multiple jobs similar to this:
my-command -input file1.in 100 0.1
my-command -input file1.in 100 0.5
my-command -input file1.in 100 0.9
my-command -input file1.in 200 0.1
my-command -input file1.in 200 0.5
my-command -input file1.in 200 0.9
my-command -input file2.in 100 0.1
my-command -input file2.in 100 0.5
my-command -input file2.in 100 0.9
my-command -input file2.in 200 0.1
my-command -input file2.in 200 0.5
my-command -input file2.in 200 0.9
To submit such a job you would write a "sample.job" file:
global file = {"file1.in", "file2.in"};
global time = {100,200};
global hotness = {0.1, 0.5, 0.9};
command = "my-command -input ##file ##time ##hotness";
Then you would test your jobs by executing:
/home/shared/system/bin/param-qsub/param-qsub.py TEST_ONLY GEN_JOBS sample.job
This will generate all the jobs to be submitted and print them to the screen so you can verify they are correct. Then submit them with:
/home/shared/system/bin/param-qsub/param-qsub.py GEN_JOBS CONFIG=test sample.job
If you want to have multiple configurations you can easily do so by adding them to the same .job file. If you added:
longTest time = {1000,2000};
Then executing
/home/shared/system/bin/param-qsub/param-qsub.py GEN_JOBS CONFIG=longTest sample.job
Would cause the same jobs to be submitted but with 1000 and 2000 in place of 100 and 200.
To find out more about param-qsub just read the beginning of the file. It has a bunch of useful features. One of the most useful is that it generates a "kill_jobs.sh" script which can be run to kill the jobs you just submitted (without touching any other jobs you may have). Of course if you need something else just copy the script to your home directory and modify it as needed.
When you run jobs that access a lot of data you should consider where you put the data. If you are accessing the same data more than once during the execution of a job it will be beneficial to copy the data to the local scratch space on whatever node you are using before running the job. This can be easily accomplished using the param-qsub script by adding an additional command before your main command similar to:
global command = "cp /home/username/##file /state/partition1/##file";
and then changing the program to look in /state/partition1/ for the file. Note, however, that if you submit a batch job you will end up getting a different node each time, so if you have many data files you will end up with copies all over the place. It is polite to clean up these files when you are done, but if you don't the administrator will when the temp storage space starts to fill up.
This will only be a big performance issue if you are submitting many jobs, each of which uses a different large file. In that case you will find that you saturate the network (125MB/s) from the file server. You may notice the system "pause" if a large job is submitted and starts doing a huge amount of disk access.
The clsuter nodes have a standard install of most common RedHat CentOS applications. This includes gnome and KDE applications. You can view a list of installed packages to see if the software you need is installed.
To administer the cluster you must read through the ROCKs documentation (linked off the cluster home page or on the ROCKs site) and the cluster configuration document to understand how it is set up. By default users do not have any admin privlidges. This is to prevent the complete anarchy that occurred on the previous CVA computer systems. If a users is a member of the "admins" group her or she can use sudo to administer the cluster.
To add a user run the addBagelsUser.py python script in the /home/bin/utilities directory as:
sudo /home/shared/system/bin/utilities/addBagelsUser.py
This script will create the user, update samba, and create default .forward and .aliases files that point to username@stanford.edu.
Then update tripwire to reflect that you've changed the files.
/opt/tripwire/etc/ make update
The cluster security profile is very low due to the fact that it is limited to both inbound and outbound .stanford.edu access and that only SSH and smb access are allowed. What this means is that the cluster administrator must keep ssh, openssl, and samba up-to-date on the head node.
The head node also has tripwire installed. This program generates cryptographically secure checksums for critical system files. A cron job runs once a day and mails reports to the root account. To check the latest report run:
/opt/tripwire/etc/ make check
If you make a change to the system you can execute:
/opt/tripwire/etc/ make update
to record the changes.
A bunch of scripts run periodically on the cluster to clean up and monitor users. Most of these scripts are run automatically by cron on the head node. The scripts are all located in /home/shared/system/bin/utilities.